The Mathematics of Pastry

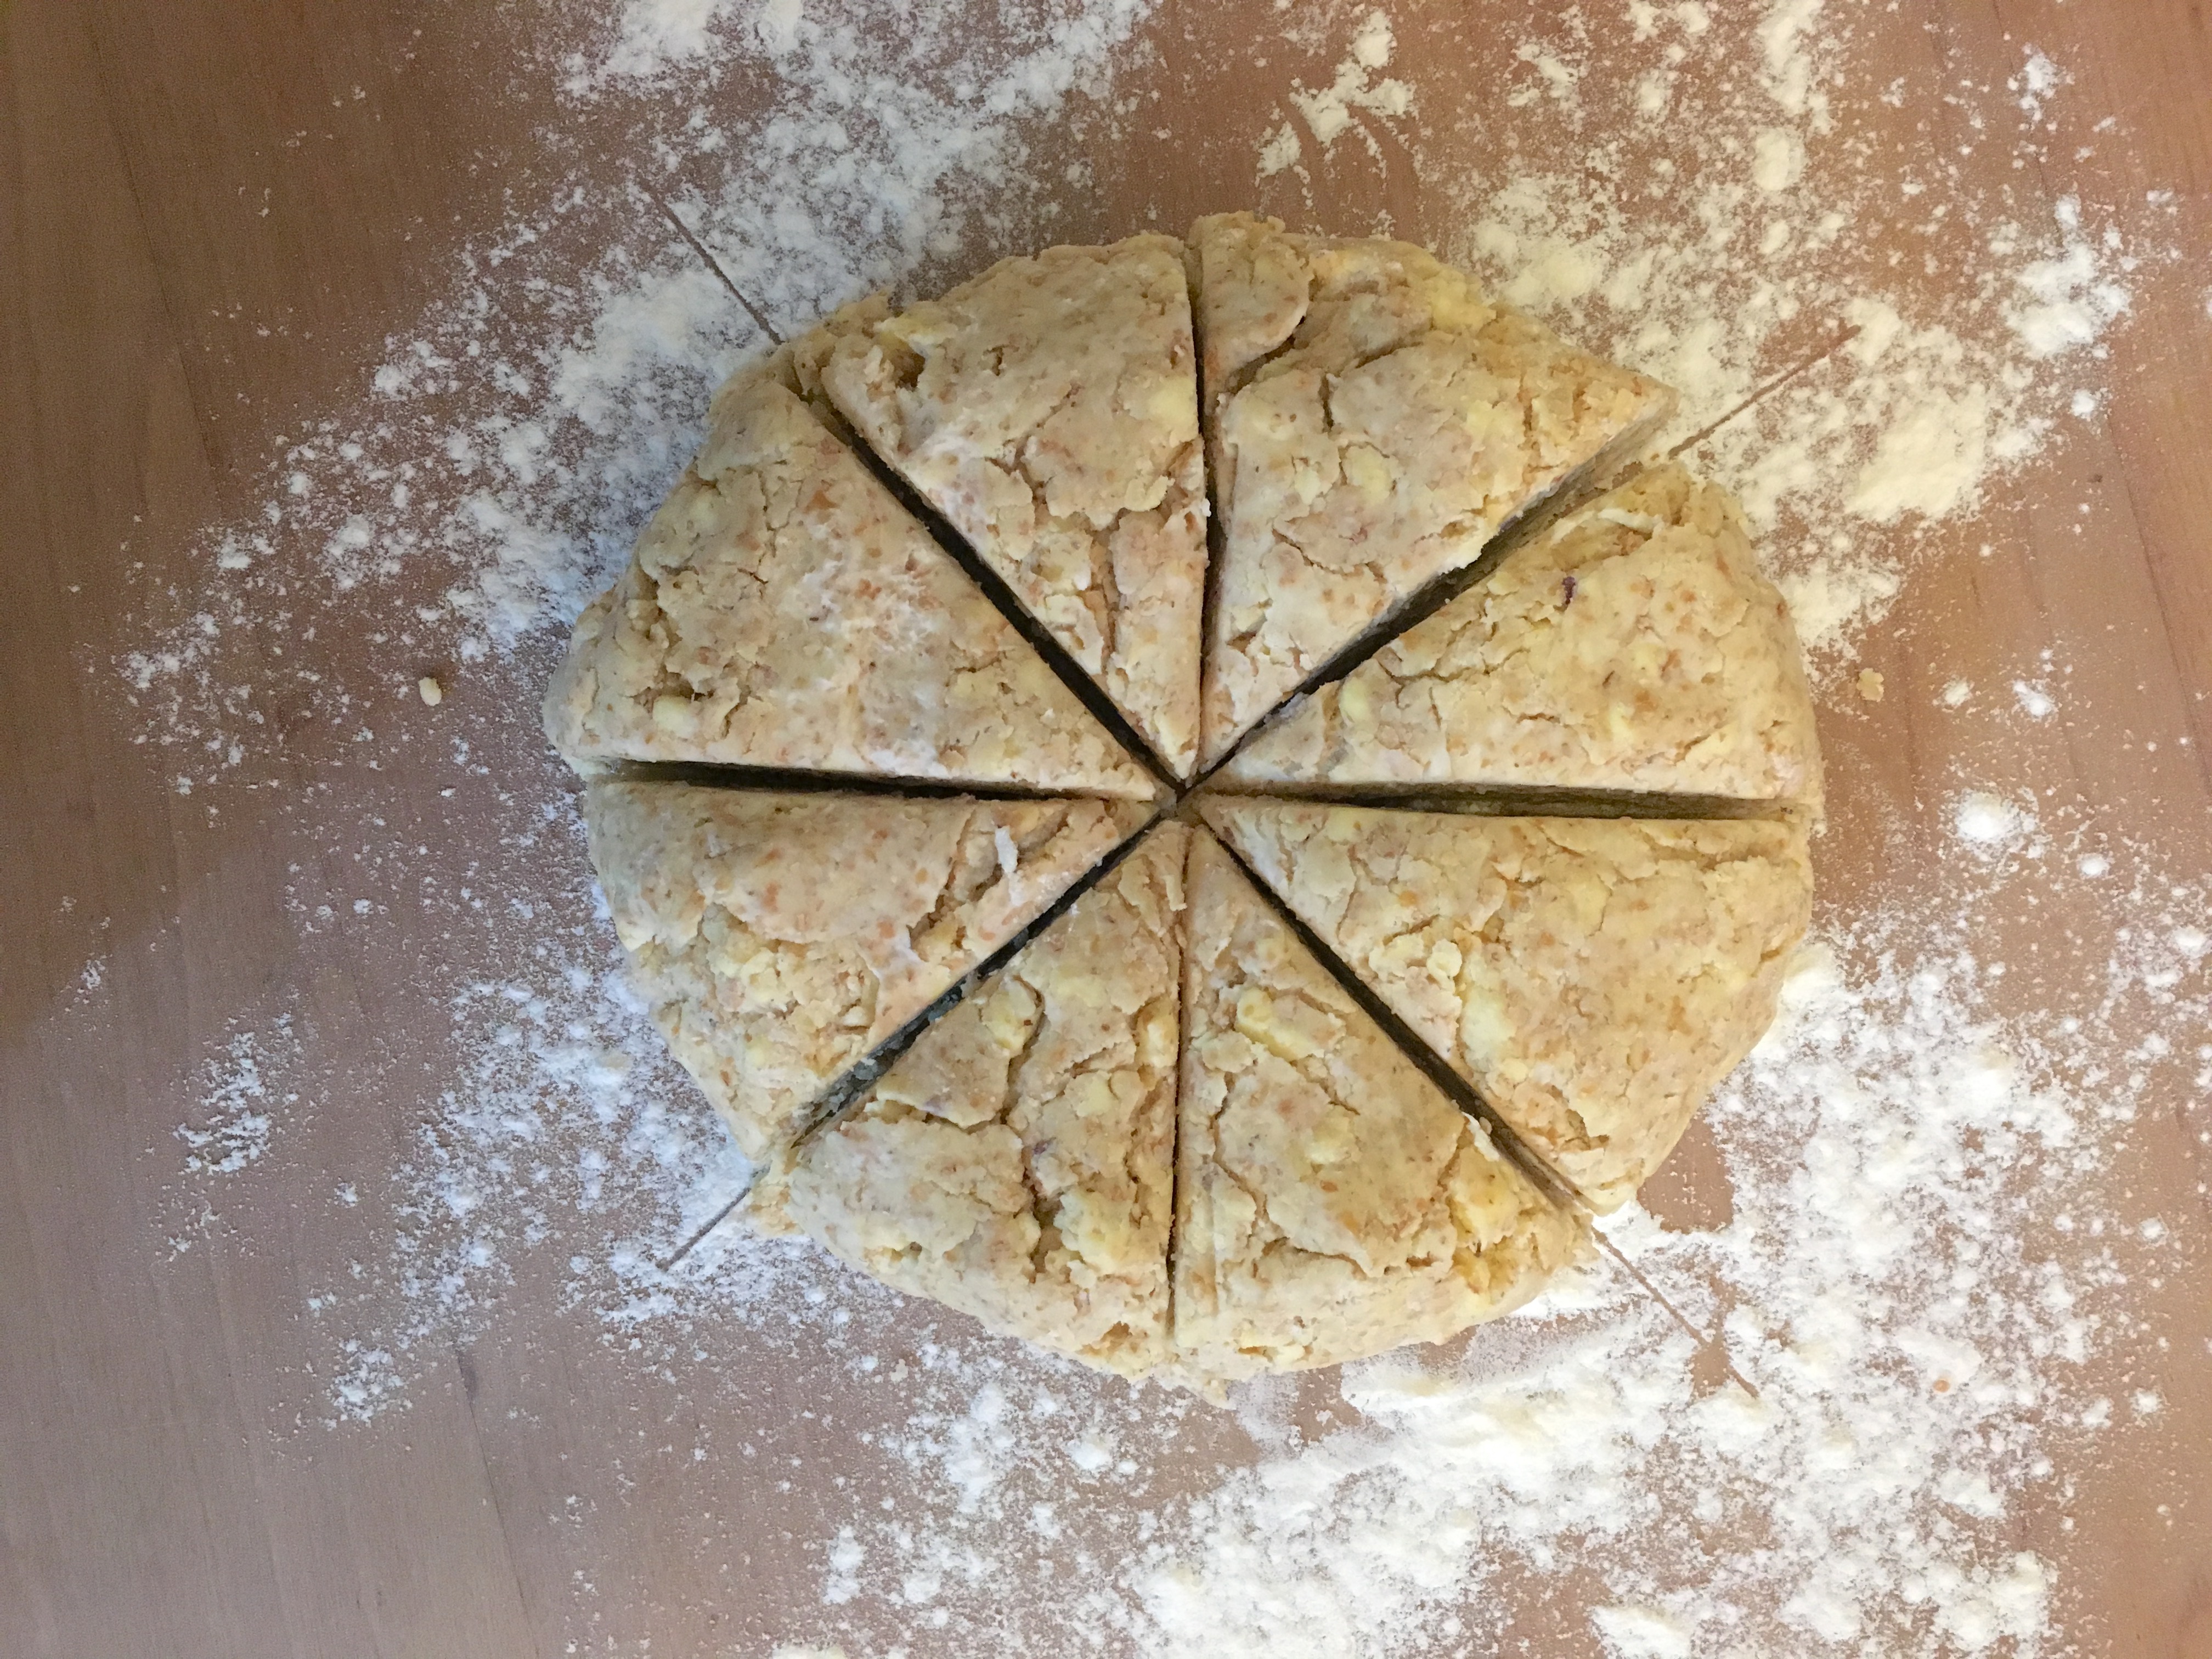
I was making pastry for cheese pasties the other day. I made a thick round of the dough on the kitchen table and cut it into eighths for rolling out into individual pastie rounds.

The cut pastry on the floured table was so lovely, I had to take a picture. There’s something pleasingly mathematical about the shapes.

Makes me think about those old school days…

Robinne makes a double-crust recipe of pie dough and divides it into eight equal portions. She makes a cheese pastie from each portion. What percentage of a pie is each resulting pastie? If each of the four family members eats one and a half pasties, what percentage of a pie has each member eaten? How long before they all die of a coronary from eating too much pastry?

Nostalgic Cookie Stars

Remember those Barnum’s animal crackers that came in the little box printed like a circus wagon and with a string handle?

When I was a kid, those were my favourites. Mum used to let us kids get a box when she did the weekly grocery shopping (no doubt a ploy to keep us quiet), and I can still remember trailing her through the store carrying my little box of cookies.

This week, I found a cookie recipe that evokes those animal crackers. From the most beautifully designed cookbook I’ve ever seen–The Gourmet Cookie Book–these Moravian White Christmas Cookies are stars.

The recipe makes a huge number of cookies, and the dough is not the easiest to work with. Make sure it is well chilled before rolling, roll it in small batches on a well-floured board, and give yourself plenty of time.

1 cup butter
2 cups sugar
4 eggs
4 cups flour
1/2 tsp salt
1/2 tsp cinnamon
1/4 tsp nutmeg
2 Tbsp sherry (I used brandy)

Cream butter. Add sugar gradually and beat until light. Add eggs and continue to beat. Combine dry ingredients, and add them alternately with the sherry. Chill several hours.

Roll dough to 1/16 inch (seriously–the thinner the better) and cut with cookie cutters. Bake on a greased baking sheet at 450°F for 7 minutes (I found that the cookies burned at this temp/time combination–keep a close eye on them and pull them out when they begin to brown).


Giant Pumpkin

I made pumpkin soup for dinner yesterday. I chose to use a jumbo pink banana squash for it, because their flesh is quite moist–perfect for soup.

I like to bake my pumpkin when I use it for soup. I cut the pumpkin in half, scoop out the seeds, and bake the halves, cut side down, on an oiled baking sheet. I tuck a few garlic cloves into the hollow under one half, and end up with beautifully roasted garlic for the soup.

The only problem is that the pink banana squash really are jumbo. I knew the largest one wouldn’t fit into the oven, so I chose the next largest one. I barely managed to squeeze both halves in together. For the soup, I used only one of the halves, and it made enough for two meals.

That’s some serious pumpkin!

Black Bean Quinoa Burgers

I love burgers made from all sorts of things. At this time of year, most of our burgers are bean based, and most are made up as I go, with whatever’s in the house.

Bean burgers require some thinking ahead, but this recipe makes enough that it’s worth the extra work.

2 cups dry black beans
1 cup quinoa
1 onion
3 cloves garlic
1 carrot
1 Tbsp paprika
1/2 tsp chipotle powder
1 1/2 tsp salt
1/4 tsp cayenne
handful fresh cilantro
2 eggs

Boil the beans ahead of time in plenty of water until soft. Drain and mash cooked beans in a large bowl (I use a potato masher for this). Cook the quinoa in 2 cups of water until the water is absorbed (10-15 minutes). Finely chop the onion and garlic. Sauté them in 2-3 Tbsp of olive oil until the onion is translucent. Grate the carrot.

Add all ingredients except the eggs to the mashed beans and stir to mix. Taste and adjust seasoning. Add the eggs and mix thoroughly.

Form into patties and place on a well oiled baking tray. Bake at 210°C (400°F) for about 25 minutes, flipping the burgers after 15 minutes.

Makes about 18 burgers. Freeze the leftovers for quick mid-week meals.

The Season for Food Porn

A spread of summer vegetables ready for grilling.

I roasted the last of the summer’s potatoes last week, and finished off the carrots over the weekend. The corn I froze in March and April is already a memory, as are the cherries, apples and blackcurrants.

We’re getting to the boring time of year, when our vegetable options are limited, and we eat a lot of beans. It’s not a problem, but it means it’s a great time to enjoy food porn. Here are just a few of my favourites.

Waffles smothered in strawberries

Roast summer veggies

Soy, parmesan-crusted zucchini sticks, watermelon, and breadsticks dipped in a rich tomato sauce.

Tomatoes ripe and flavourful

Apricot upside down cake

Homemade strawberry ice cream

Pumpkin Pizza

Ordinary pizza on the left, pumpkin pizza on the right.

I tried something yesterday that I’ve been thinking of for a long time. I’m sure that if I googled it, I’d find millions of people who had already done this, but for me it was new.

When we make pizza, we always make two–we eat one, and put the other in the freezer for a quick mid-week meal. So when we made pizza last night, I decided to make one of them a pumpkin pizza. I figured if it was awful, we could at least eat the other one.

It wasn’t awful.

In fact, it was incredible.

Here’s what I did…

3 1/2 cups cooked winter squash, mashed (I used kabocha squash–you want something with dry flesh so your pizza doesn’t end up too soggy)
1 onion
2 cloves garlic
fresh sage and thyme to taste
1/2 tsp salt
50 g blue cheese
grated edam, mozzarella, or other mild cheese

Chop and sauté the onion and garlic in 2 Tbsp olive oil until the onion are translucent. Add chopped herbs toward the end. Mix into the winter squash along with salt.

Spread this mixture evenly over the rolled-out pizza dough. Crumble the blue cheese and dot it over the surface. Top with grated cheese of your choice and bake as for any other pizza.


Name that dinner…

While doing the afternoon chores today, I considered what I would make for dinner. Before I came inside, I gathered some of the ingredients I needed from the garden and from storage in the shed.

Can you guess what vegetable I paired with these flavourful ingredients?

Yep.

You got it.

Pumpkin.

Truthfully, I didn’t decide exactly what I was making until after I gathered these seasonings; I only knew I wanted pumpkin. And to me, there’s nothing that says pumpkin like sage, thyme, onion and garlic. (Unless, of course, you’re talking sweet pumpkin, in which case it’s cinnamon, nutmeg, and allspice.)

I think many gardeners do this. We look at what vegetables we have on hand, and often know the ingredient list for our meals long before we know quite what we’re making.

Tonight I used my pumpkin in a cheesy pasta, but it could have just as easily become risotto, galette, or pot pie with very little change in ingredients.

Of course, the only reason I think sage and thyme when I consider pumpkin is because of my cultural background. If I were Indian, I might pair my pumpkin with cumin, coriander, garam masala and turmeric for a spicy pumpkin curry.

It’s what keeps gardeners from getting bored of eating the same vegetables day after day. Small changes can make a big difference in the final product.


Making It Up as I Go

Last Friday, the stars aligned for a cheese and onion tart—I had pie dough already made, a batch of chevre that needed to be used, and plenty of eggs and shallots.

I couldn’t be bothered looking up a recipe, though I knew I’d posted one here before. Instead, I made it up as I went along.

I knew I wanted plenty of onions, and I wanted them sautéed slowly until they were browning. So I got them going.

I knew my normal quiche used three eggs, but I wasn’t going to use more than a splash of milk in this, so I whisked up four eggs and a glug from the milk bottle.

I like thyme with eggs and cheese, so I picked some and tossed it into the onions.

And cheese. Lots of that. I spread a thick layer of chevre on the bottom of the pie crust, topped it with my onions, and poured the eggs over it all.

What could go wrong?

Nothing, apparently. It was divine.

And that is the best part about cooking, I think—being inspired by wonderful ingredients, and following your own tastes to create delicious food.

Lemongrass

I brought the lemongrass (Cymbopogon citratus) indoors last weekend. It’s not supposed to be able to handle freezing temperatures. It does, but it doesn’t like them. The one winter I left it outside, it died back to just a few well-protected shoots in the centre of the plant.

Thankfully, it doesn’t need much protection. My office is unheated at night, but it provides enough protection to keep the lemongrass alive.

We don’t use much lemongrass. Though its lemony flavour is nice, it doesn’t have the sourness of real lemon, so I find lemongrass tea too sweet.

However, we do occasionally use it in stir fries, marinades and salad dressings, where it imparts its lemony flavour alongside other, more sour ingredients. We were first introduced to its use in salad dressings by Yotam Ottolenghi’s wonderful cookbook Plenty (which I’ve mentioned before). His sweet winter slaw recipe calls for the following dressing:

100ml lime juice
1 lemongrass stalk, chopped
3 Tbsp maple syrup
2 Tbsp toasted sesame oil
1 tsp soy sauce
1/4 tsp chilli flakes
4 tbsp light olive oil or sunflower oil

Place all ingredients except the oil in a saucepan and boil for 5-10 minutes until thick and syrupy. Allow to cool, then strain. Whisk in the oil and toss with your salad.

It’s an excellent way to use lemongrass, pairing with salty, oily, and sour ingredients that enhance its flavour. It’s worth giving up office space to the plant, just for this dressing.

Pear Tart

Several kilos of beautiful pears in the house inspired pear tart for dessert last night. Taking inspiration from a few recipes, I came up with the following. It was lovely!

Peel, core, and slice 4 large pears.

Combine and sprinkle over the pears:
1/4c flour
3 Tbsp sugar
3/4 tsp cinnamon
1/4 tsp nutmeg
1/8 tsp cloves

Toss pears with flour mixture until evenly coated.

Make your favourite pie crust recipe—enough for a one-crust pie. Roll the crust into a large round (about 15 in/38 cm in diameter) and place on a baking sheet.

Arrange the pear slices in the middle of the crust, leaving about 5 cm/2 in around the edge. Bonus points if you can make a pretty spiral, but it tastes the same either way. Pour any remaining juice over the top, then fold the edge of the crust up and over the pears.

Bake at 190ºC (375ºF) for about 40 minutes. Allow to cool at least 15 minutes before cutting.

**Pears are incredibly sweet, and though this tart was divine, I like a little tartness in my tarts. Next time I will add some grated lemon peel to the filling or serve it with yogurt.