Lentils

100_3491 smEver since our stint in the Peace Corps, we’ve eaten lentils at least once a week, often several times. Lentils and rice was a staple meal in Panama, and it has since become a comfort food. And since lentils feature in many cuisines, they find their way to our table in many guises.

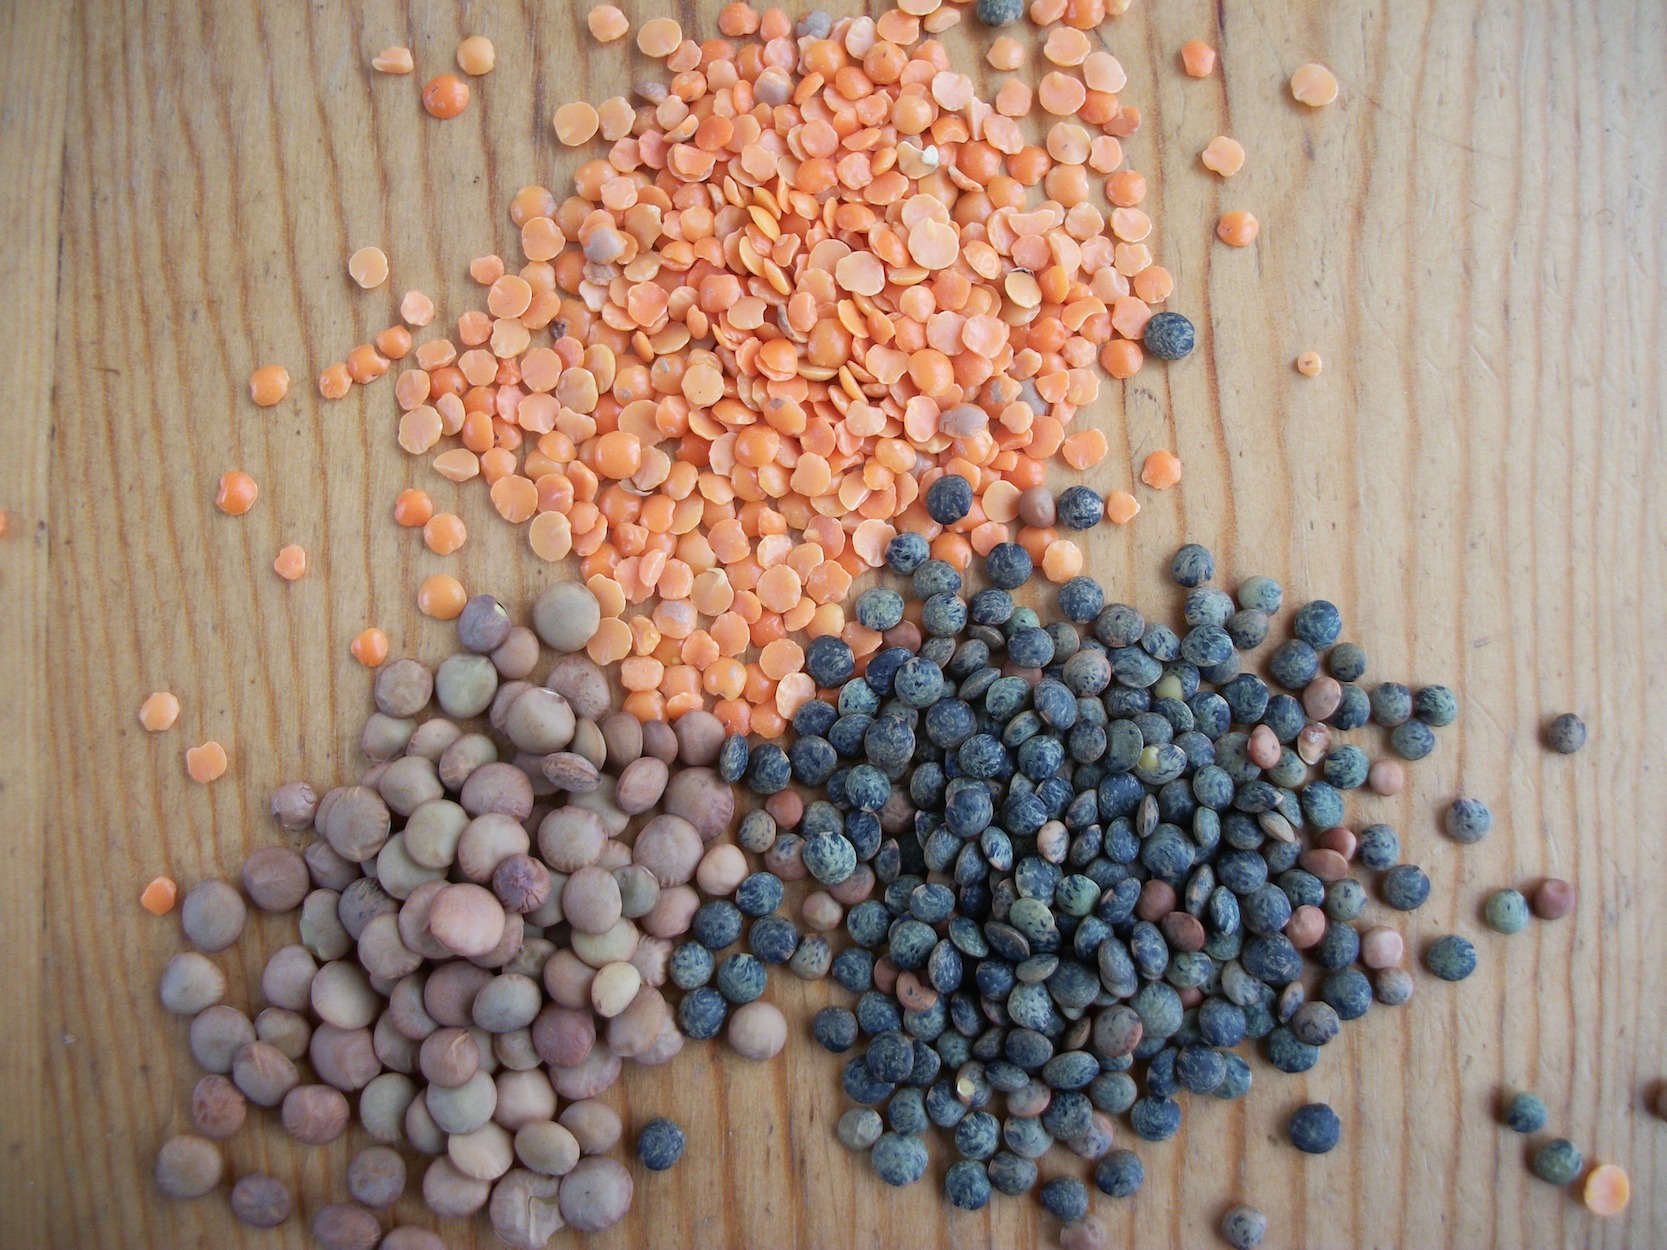
As a gardener, I found lentils intriguing. They show up in none of the seed catalogues, yet they can be grown in a wide range of conditions and locations. The two biggest lentil producing countries are Canada and India. If they grow in these disparate climates, surely I could grow them here!

With this in mind, a couple of years ago, I took a handful of lentils purchased at the grocery store and tested their germination—100%. Hooray! I was in business! I planted two types of lentils—brown and French green—at the same time I planted my beans. They sprouted well and grew vigorously. Their feathery leaves were a beautiful and intriguing addition to the garden. Patiently I watched them grow, flower, and set seed.

When the plants died back and the seed pods dried, I harvested whole plants, laden with pods.

Then I discovered why home gardeners don’t grow lentils.

Each pod contained only one or two seeds. If the plants were sufficiently dry, many of the seeds could be extracted from the pod by rubbing the plant between my hands. But even dry, a lot of seeds had to be picked individually out of the pod. And rubbing the dry plant left a lot of chaff mixed into the lentils. The chaff and the lentils were about the same weight, so blowing the chaff off also blew off many of the lentils.

After hours of painstaking work, I had enough lentils for, maybe, two meals. From the same garden space, and for a lot less work, I could have produced a year’s worth of dry beans.

I don’t regret growing lentils, and I’m pleased to know I can grow them. I’m also quite content to let someone else grow them (and harvest them mechanically) for me.

Strawberry Muffins

100_3478 smI froze strawberries for the first time last summer, and I’ve been trying to find ways to use them. The problem is that I think the frozen strawberries taste disgusting unless they are further processed after thawing. That’s not a problem with the sliced and sugared ones—throw them into a saucepan and simmer them down for a while, and they make an excellent strawberry syrup for pancakes. I can use up a lot of frozen strawberries on pancakes!

It’s the ones I froze whole that are causing me trouble. But yesterday I found a very nice way to use them—Strawberry yogurt muffins! This is a variation on Sour Cream Muffins in King Arthur Flour’s Whole Grain Baking.


2 cups whole wheat flour

½ cup all –purpose flour

1 ½ tsp baking powder

½ tsp baking soda

½ tsp salt

4 Tbsp (60 g) butter, softened

½ cup sugar

2 large eggs

1 tsp vanilla

1 cup plain yogurt

2 cups frozen strawberries

Mix flours, baking powder, baking soda and salt in a medium bowl. In a large bowl, cream the butter and sugar together until light and fluffy. Beat in the eggs, one at a time. Add the vanilla and yogurt. Add the dry ingredients and mix just until smooth. Slightly thaw, then roughly chop the strawberries. Fold them into the batter, and refrigerate at least an hour (for breakfast muffins, make the batter the night before, and refrigerate overnight). The strawberries will release juice, so you’ll need to give the batter another stir just before scooping it into a greased muffin tin.

Bake at 400°F (210°C) for about 25 minutes. Makes 12 – 15 muffins depending on how big you like them.

Wedding Bowls

100_3483 smTwenty-three years ago, when Ian and I got married, a whole lot of people gave us gifts. Most of those gifts were kitchen items. In addition to pots, pans, and knives, we acquired 23 bowls that day–ceramic mixing bowls, stainless steel mixing bowls, hand-blown glass serving bowls, artistic pottery bowls, wooden bowls… You name it, we got it.

We could have broken one a year for every year of our marriage so far. But most of those bowls are still with us, 23 years later. All are well-used, and remind us even now of the people who gave them to us all those years ago.

So, thanks everyone! Our wedding bowls ring daily!

The Laboratory

IMG_2982 cropTo celebrate our 23rd wedding anniversary, my husband and I gave our kids their first experience staying home alone, while we went out for lunch to The Laboratory, a new pub in Lincoln. We’ve been waiting impatiently for this pub to open—it’s construction was delayed, and it’s been great fun to watch it go up. Built almost entirely with reclaimed materials, the building looks like it has been there for a hundred years already. The interior is quirky, and in keeping with the laboratory theme—water is served in Erlenmeyer flasks and beakers, table numbers are clipped to Bunsen burners, and tables are lit by a motley assortment of old articulated desk lamps.

The food is good, but limited—only 1 or 2 vegetarian options. The chips (fries), however, are excellent, and are served with aioli. We had hoped for a mozzarella sandwich today (which we’ve both had on previous visits), but as it wasn’t on the menu, we opted for a pizza. Lots of flavour on a cracker-thin crust—the perfect lunch pizza.

The Lab’s own brewery isn’t up and running yet, but they’ve got a nice assortment of craft beers. I enjoyed a lovely oatmeal stout (and was thankful I wasn’t driving home afterwards).

The best part of lunch was that the house didn’t burn down while we were away, and the only one who got into any trouble while we were out was the cat.

Food Security

A post-quake community garden in Christchurch

A post-quake community garden in Christchurch

After the recent earthquake in Nepal, I wrote a blog post about food security in the face of natural disasters, but I never actually posted it.

But this piece about using vacant red-zoned land to produce food in Christchurch, in the news today, made me come back to that post and decide it was worth posting.

After the February 2011 quake in Christchurch, I saw firsthand how much more devastating natural disasters could be in the city verses in rural areas. Responding to a request for help on Trade Me, my husband and I, along with a couple of neighbours, loaded the car with shovels, wheelbarrows, tools and food, and ventured into the hard-hit eastern suburbs.

We spent a day clearing houses and yards of liquefaction, tearing out buckled and destroyed linoleum, and sharing out the vegetables, bread, and milk we brought from our farms. The people we met were amazingly strong in the face of the destruction around them—not one house in the neighbourhood was still straight and level, and the street was nearly impassable, buckled and cracked.

But they had no tools to tackle the devastation. The carload of tools we brought with us for the day was more than the entire neighbourhood could muster. City living doesn’t require heavy duty wheelbarrows and large shovels, and there were more willing hands than tools to go around.

Then there was the lack of gardens in the city. With stores closed and power out for many days, getting and preparing food was difficult. While meals were airlifted into the city, in the country we simply lived on food from the garden.

So, how do we build resilience and food security into our cities? How do we create cities that can feed themselves, at least for a short time, after a natural disaster? Part of the answer lies in community gardens that can provide food and positive community support, as they did in Christchurch after the 2011 quake. Part of the answer lies in taking a long-term approach to city planning—planting fruit trees in public parks, preserving green space with good soil within the city instead of covering it all with buildings and roads.

I would love to see Christchurch, and all cities, bring food production back within the city limits. No, a city cannot produce all its food, but having community gardens and food-producing commons makes a city a more humane place, even when there isn’t a natural disaster to weather.

Flowers to brighten the day

100_2148 smIt’s a dreary, drizzly day, so I thought I’d base today’s post on a lovely flower photo from last summer!

Ten years ago, when we moved into our house, there were drifts of bulbs–glads, daffodils, snow drops, grape hyacinths, etc.—planted all around the house. One of our first jobs was to re-pile the south side of the house, which was largely held up by a few broken bricks and toilet seats (I kid you not). We hated to just trample all those bulbs, and we wanted to get vegetation away from that side of the house anyway, to help dry it out a bit. So we dug up all those bulbs—hundreds of them. I tucked many of them into the end of the vegetable garden, for lack of any other place to put them. My intention was always to remove them once we’d managed some landscaping in other places.

I did end up moving most of them, but I’ve grown rather fond of the glads that pop up around the garden gate every year. That end of the garden isn’t very productive because there is too much tree competition, so I’ve left the flowers. Vegetables are every bit as ornamental as “ornamental” plants, but it’s nice to have a bit of useless beauty amidst all those hard-working vegetables (and the hard-working gardener).

Fakin’ Bacon

Bac-UnFor many years we resisted the vegetarian meat substitutes. TVP always tasted like tough cardboard to me, and I’d never had a vegetarian sausage that I wanted to finish eating. Besides, who really needed meat anyway with all the variety in the vegetable world? To try to get a meat fix by eating some highly processed vegetable just didn’t seem right.

But after a trip to China, where the art of meat substitutes is, apparently truly an art (they go to great lengths to make the substitute taste, feel, and even look like the real deal (down to gristle, and skin), Ian decided he wanted to try making some of those substitutes, just for the fun of it. The gluten-phobic should probably read no further, because these meat substitutes use wheat protein (gluten) to replace the meat protein.

I was highly suspicious, as Ian worked with the stretchy, slimy mass of gluten, and still wasn’t sure, even once the fake meat was made and ready to be prepared for a meal. But to my surprise, I ended up quite enjoying the stuff.

What we found was that preparing these meat substitutes makes all the difference in whether they are good or revolting. The mock duck he made was great when fried and served in flavourful oriental dishes, but took on the texture of a gumboot when boiled in a stew. The bacon was delicious, but needed to be very thinly sliced and fried hot to get that crispy bacon texture.

I prefer the bacon over the mock duck–I find that greasy, salty, crunch irresistible. And as a bonus, the bacon fits nicely into the bread oven’s heat cycle, making use of the cool tail end, and eking yet another few meals out of a bread day’s labour.

You can find the vegetarian bacon recipe Ian uses here. Whether you’re vegetarian or not, it’s a fascinating food, and well worth trying at least once, just for the adventure.

Getting over the hump

knittingI am not a knitter. People have been trying to teach me to knit since I was seven years old, to no avail. I’m very crafty in other ways. I weave, sew, quilt and embroider; I was once quite good at macramé (when macramé was “in”); I’ve done quilling and scherenschnitt, basketry and rug braiding, beading and jewellery making. I’m proficient at all these crafts and more, but put knitting needles in my hands, and suddenly I’m all thumbs.

But I’m also stubborn. When my mother tried to teach me to knit, and failed, I tried again. When the neighbour tried to teach me to knit, and failed, I tried again. When a friend tried to teach me to knit, and failed, I tried again. I bought Debbie Bliss’ book How to Knit, and forced myself to knit and unravel, knit and unravel, until I could manage to knit a row without dropping or adding stitches. It wasn’t pretty, and it was a stressful process. I’d finish a knitting session with a sore neck and tense muscles. I made myself a pair of slippers. Then I made another pair, and another, and another, and another. Six pairs of slippers later, I was thoroughly sick of slippers, and still struggled with knitting. I took a break…a ten month break. When I came back to knitting, I had to learn all over again. I tried out some different stitch patterns, attempted knitting in the round, and ended up unravelling most of my work.

Another year passed. My slippers wore out, and winter came. My feet were cold, so I tried knitting again. I had to pull out the knitting book in order to remember even the basic stitches.

But something had changed. After the first clumsy rows, I began to relax. The stitches came naturally. My fingers didn’t cramp. I finished the first slipper in a day. I was over the hump.

As parents, my husband and I regularly have to push our children to get over that hump. Learning a new skill is hard work, and there are precious few rewards at the beginning. Playing the piano, there are many wrong notes, and the songs sound clunky, the rhythm erratic. Making pastry, there could easily be half a dozen dense, oily lumps before the first magical, flaky crust. Juggling, there are a lot of balls rolling away on the floor before they soar effortlessly from hand to hand.

For some skills, the hump is low, and easily surmounted. For others, that hump is like a steep mountain with no breathtaking views until the very top. As a parent, one of my jobs is to push the kids to get over those mountains and not quit before a new skill becomes fun. It doesn’t mean becoming a tiger mom, but it does mean enforcing some discipline in kids who may not want to practice their instrument, because it’s a struggle, and they know they sound awful. It means asking the kids to help prepare dinner, and patiently encouraging them as they slowly and unevenly slice the carrots or mix the dough. It means cheering on the child who comes last in the race, and running alongside her as she prepares for the next one.

Hopefully, if we do our job right, the kids will be able to push themselves over those humps on their own one day.

They might even learn to knit.

Paneer

100_3424 smThis is such an easy, wonderful cheese to make, that even without a ready supply of fresh goat milk, I’d keep making this cheese.

Paneer is used largely in Indian cooking, though I’ve been known to throw it into oriental stir fries where it takes the place of tofu. No matter where you use it, it gets lovely crispy edges when it fries, and it soaks up spicy flavours.

Paneer takes almost no time to make (in cheese terms, anyway), and requires no special equipment or cultures. As a friend of a friend once said, “Paneer is very dangerous.” Too easy to make and too good to resist! Give it a go!


1 gal whole milk

2 tsp citric acid, dissolved in ¾ c. hot water OR ½ c. fresh lemon juice

Heat the milk on high to a foaming boil, stirring constantly to avoid scorching. Turn the heat down to low and quickly add the citric acid solution, stirring very gently. The milk should curdle almost instantly. (If it doesn’t, add a little more acid). As soon as the milk has curdled, remove it from the heat, and let it sit, covered, for 10 minutes. Spoon the curd gently into a colander lined with cheesecloth (3 layers if you’re using “cheese cloth”, 1 layer if you’re using butter muslin (known here as baby muslin; you can also just use a clean handkerchief). Once the large chunks have been transferred to the colander, gently pour the rest of the liquid and curds into the colander. Pull up the corners of the cloth and twist gently. Hold the bundle under lukewarm running water for 10 seconds, then hang to drain for 3-4 hours. To speed up the draining, you can press the cheese under a light weight (put a small plate or saucer on top of the cheese to spread the weight evenly; I use a 2 litre bottle of water) for 1 ½ hours. Refrigerate until you’re ready to use it; use within 3 days.

*When it comes time to cook paneer, most recipes say to fry it. If you don’t use a non-stick pan, the paneer will stick and fall apart. If you do use a non-stick pan, the paneer will sputter and spit hot oil everywhere. I avoid both by baking it on a lightly oiled non-stick baking tray in a hot (230°C/450°F) oven until it is nicely browned.